version=3.8.5
wget https://www.python.org/ftp/python/${version}/Python-${version}.tgz
tar xzvf Python-${version}.tgz
cd Python-${version}# Linux (or any Unix-like system), the default prefix and exec-prefix are /usr/local.# thus you should be able to omit --prefix here# --enable-optimizations option for significant speed boost (10-20%) but much# slower build process
./configure --prefix /usr/local --enable-optimizations
make
sudo make install# OR if you want to skip creating the python link then:sudo make altinstall
in case you want to remove and re-install it again cause some software
was missing before installation
Decide on most money worth indoor cycling bike and software options.
Motivation:
I run almost everyday but some days, my knee hurts and some days it rain on me.
For those reasons, I have been thinking of other cardio option other than
running and swimming. Biking seems so fun with right software and easy on your knee.
Software
Just like computer, without right software device (bike) won’t be much useful.
You will be more motivated if software is good (addictive and stress free) and you will hopefully use your
device to the full potential.
So I decided to look from angle of software perspective.
There are 3 notable software out there.
zwfit is still in beta (as of 2018-10-03) but getting
much attention from indoor cyclist.
There are 3 level of setup. This video is very comprehensive.
Assuming that you already have mountain bike. If not, add that to cost. $100 to $600+.
Basic:
* Bike home trainer
* The cheapest one you can get starts from around $50.
* Garmin speed sensor is less than $40
Flexible Setup
* Bike home trainer
* Power Meter. Power meter is is a device fitted to a bike that measures the power output of the rider.
Most commonly, power meters use strain gauges that deflect slightly when a force is applied.
By measuring this torque and combining it with angular velocity, power (measured in watts) can be calculated.
It measure much more than speed and cost more than speed sensor.
Premium Setup
* Smart trainer which will give you automatic resistance. Smart trainer is available from around $230.
Also you want to have monitor. If you want dedicated monitor or tablet, include that in the cost as well.
Monthly Membership Fee $14.99 (used to be $10)
ifit Coach
iFit will give you access to:
Personal trainer
Unlimited virtual travel
Virtual gym membership
Workout classes
The official training bike is ProForm Tour De France
which automatically simulates every hill and dip etc.
The software is also available on both Android and iOS and just like most
software, review on Android is so low. Chances are depends on your device, it doesn’t work.
iFit isn’t well-integrated with TDF bikes (Often crashes)
So kind of “no”….
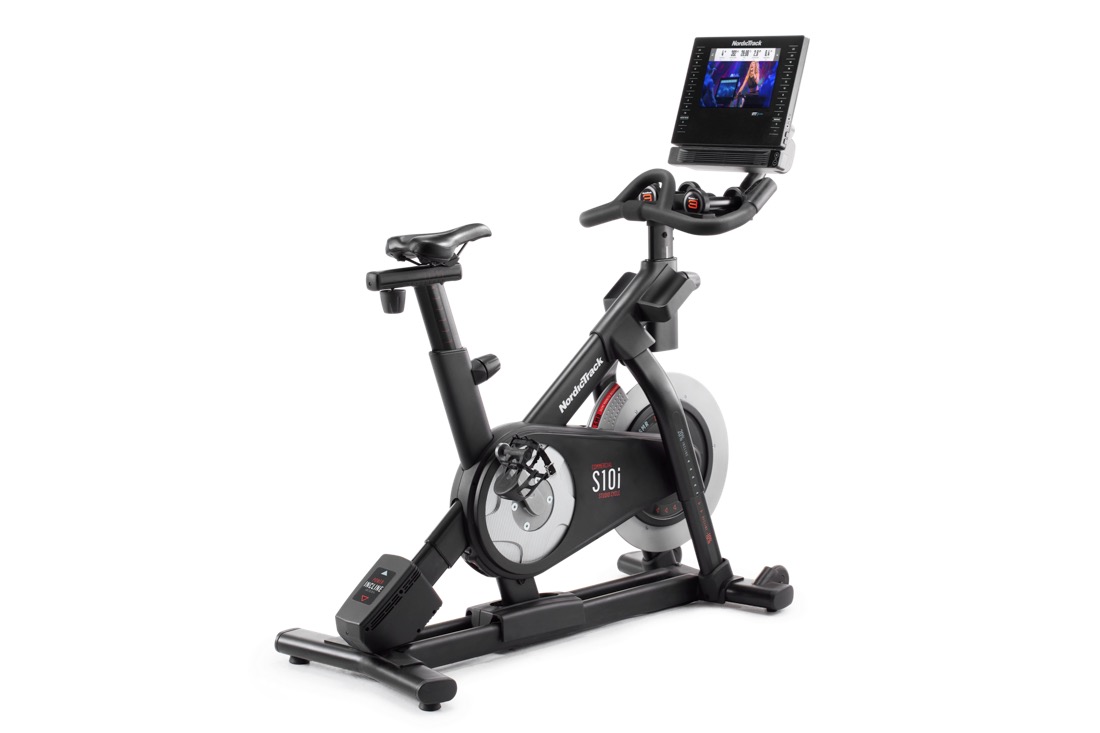
Other compatible bike NordicTrack Commercial S10i Studio
workout video automates your bike’s resistance and incline/decline to follow the coach’s plan.
Comes with 10” Smart HD Touchscreen. $1500 includes first year membership cost.
Pay all at once and save 15% - $33 per month or opt to pay monthly for $39 per month
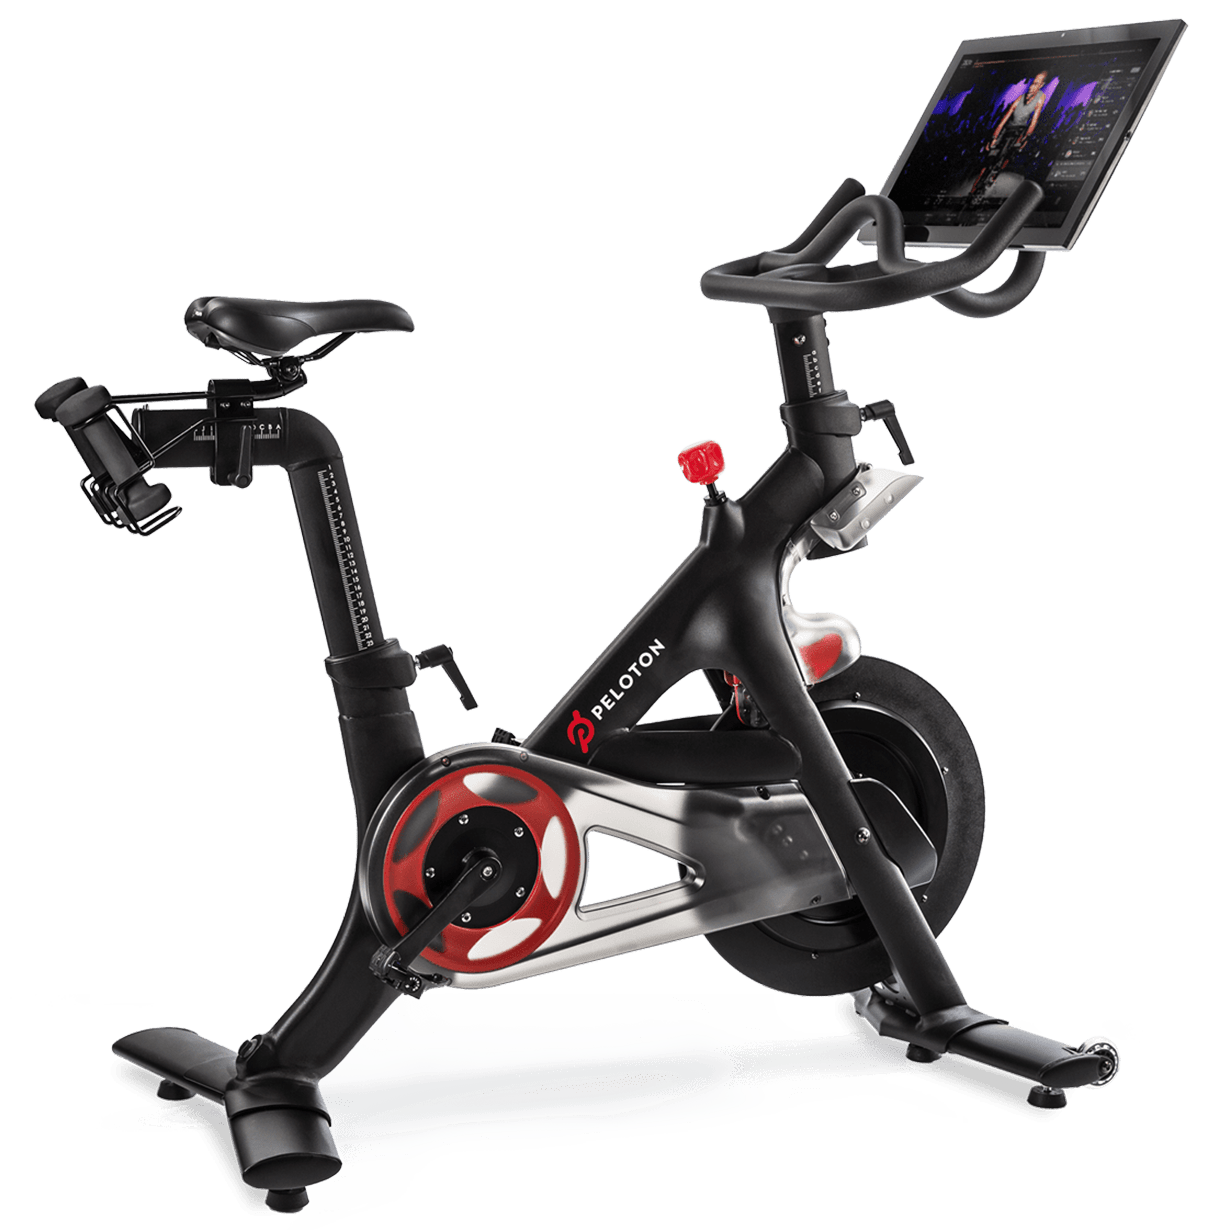
Peloton
Monthly subscription for the software is $39 if you own their bike.
Standalone is $12.99 for a monthly membership but lacks various metrics as it is not linking to device.
Currently Android OS user has no option.
Peloton is only available on iOS and planning to release for Android on late 2018.
So you could go with just buying good spin bike which ranges from
Bike comes with amazing 22 inch touchscreen.
With its live-streaming and on-demand classes, costs roughly $3,000 for the first year
(Bike $2000 + $250 for shipping and setup) and nearly $500 each year thereafter.
Without paying the $39 monthly subscription, you’re left with just three classes
and a free-ride mode that displays only real-time data on the screen,
with no leaderboard-inspired competition or any record of your efforts.
No automatic resistance control by the way.
Nice looking bike though
Verdict
I don’t know yet… but considering automatic resistance control (Peloton is not supporting),
I was learning towards
either NordicTrack Commercial S10i or Zwift setup (buy bike, trainer and monitor etc).
But people love Peloton over NordiTrack because of
(a) unlimited classes (b) magnetic resistance for easier adjustment.
You got blog going with Blogger and now ready to setup custom domain!
How to setup custom domain?
First, you will need to register your domain.
To register your domain, you want to go through domain registrar.
To become the domain registrar, you will need ICANN Acrediation so you want to go ahead register through registrar instead of becoming one.
Now there are many of them out there. The popular ones are likely GoDaddy.
I see Google is providing this service too.
I decided go to with NameCheap.com
for a few reasons:
Free WhoisGuard forever so your data is protected from whois database.
Now you’ve registered your domain. What’s next?
Sign in to Blogger.
From Upper left drop-down, Select the blog you want to update
On the left menu, click Settings and then Basic.
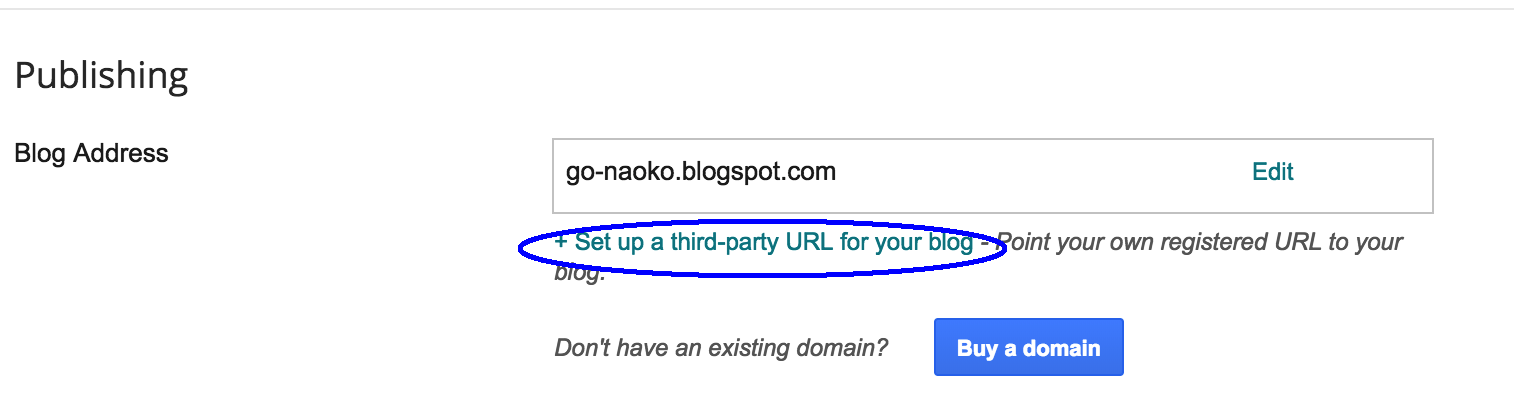
Under “Publishing,” click “+ Setup a 3rd party URL for your blog”.
Type the URL of the domain you’ve purchased.
Click Save.
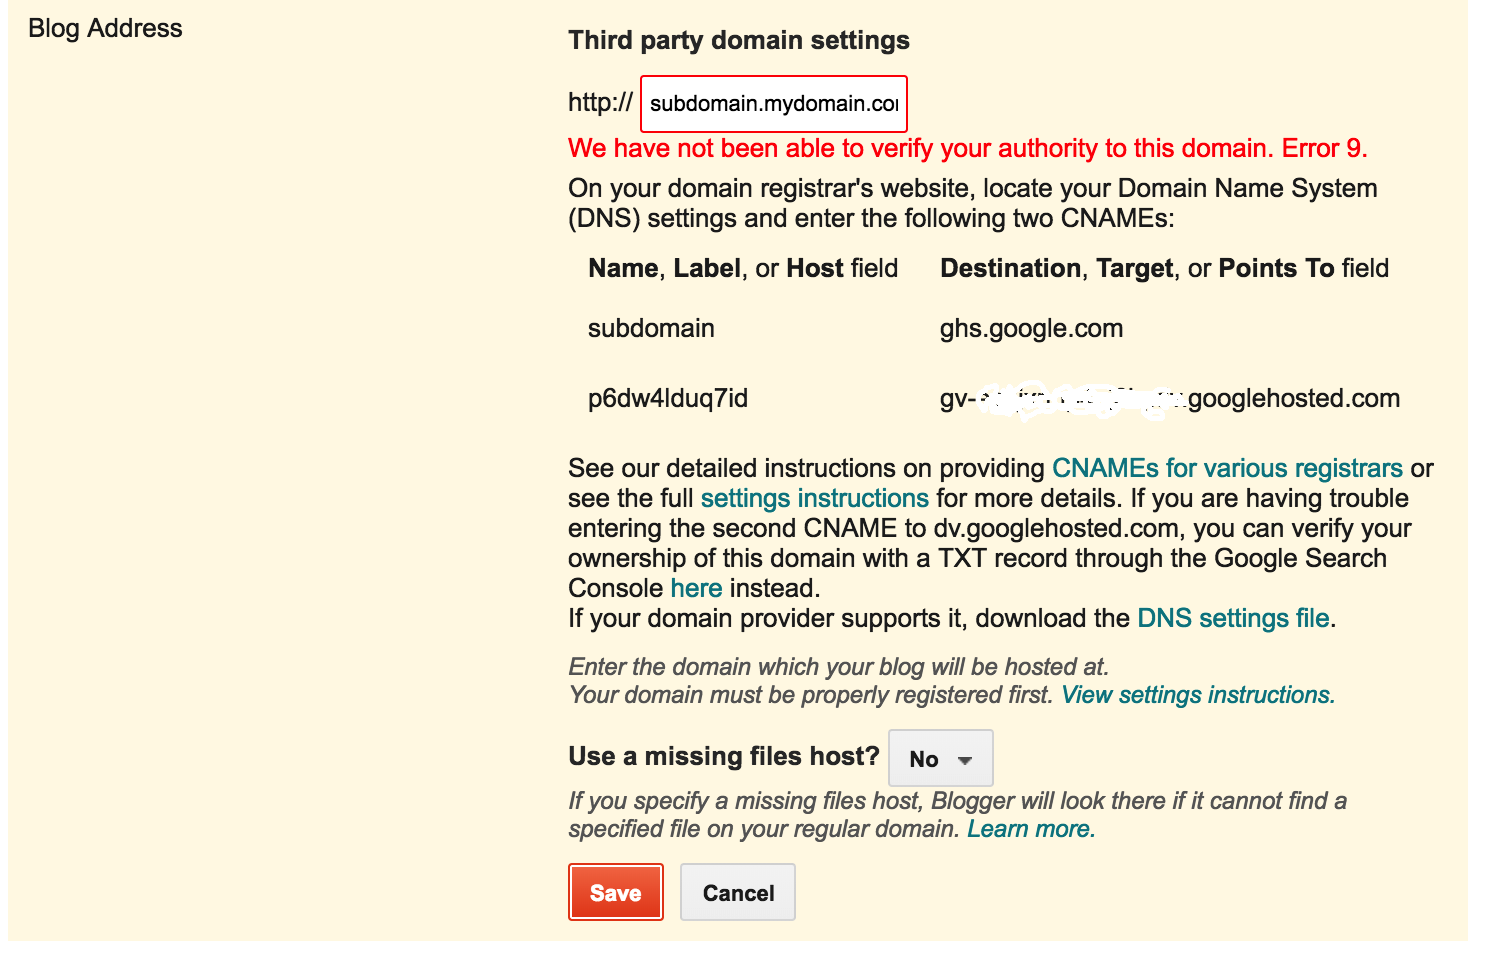
You’ll see an error with two CNAMEs.
On “Name, Label or Host” column, 1st row it should show the subdomain you entered,
like “blog” or “www”. For the case of this example, it is “subdomain”
For destination, it should show “ghs.googlehosted.com” and common to everyone.
On 2nd row destination, it is s different for each person and is specific to
your blog and your Google Account.
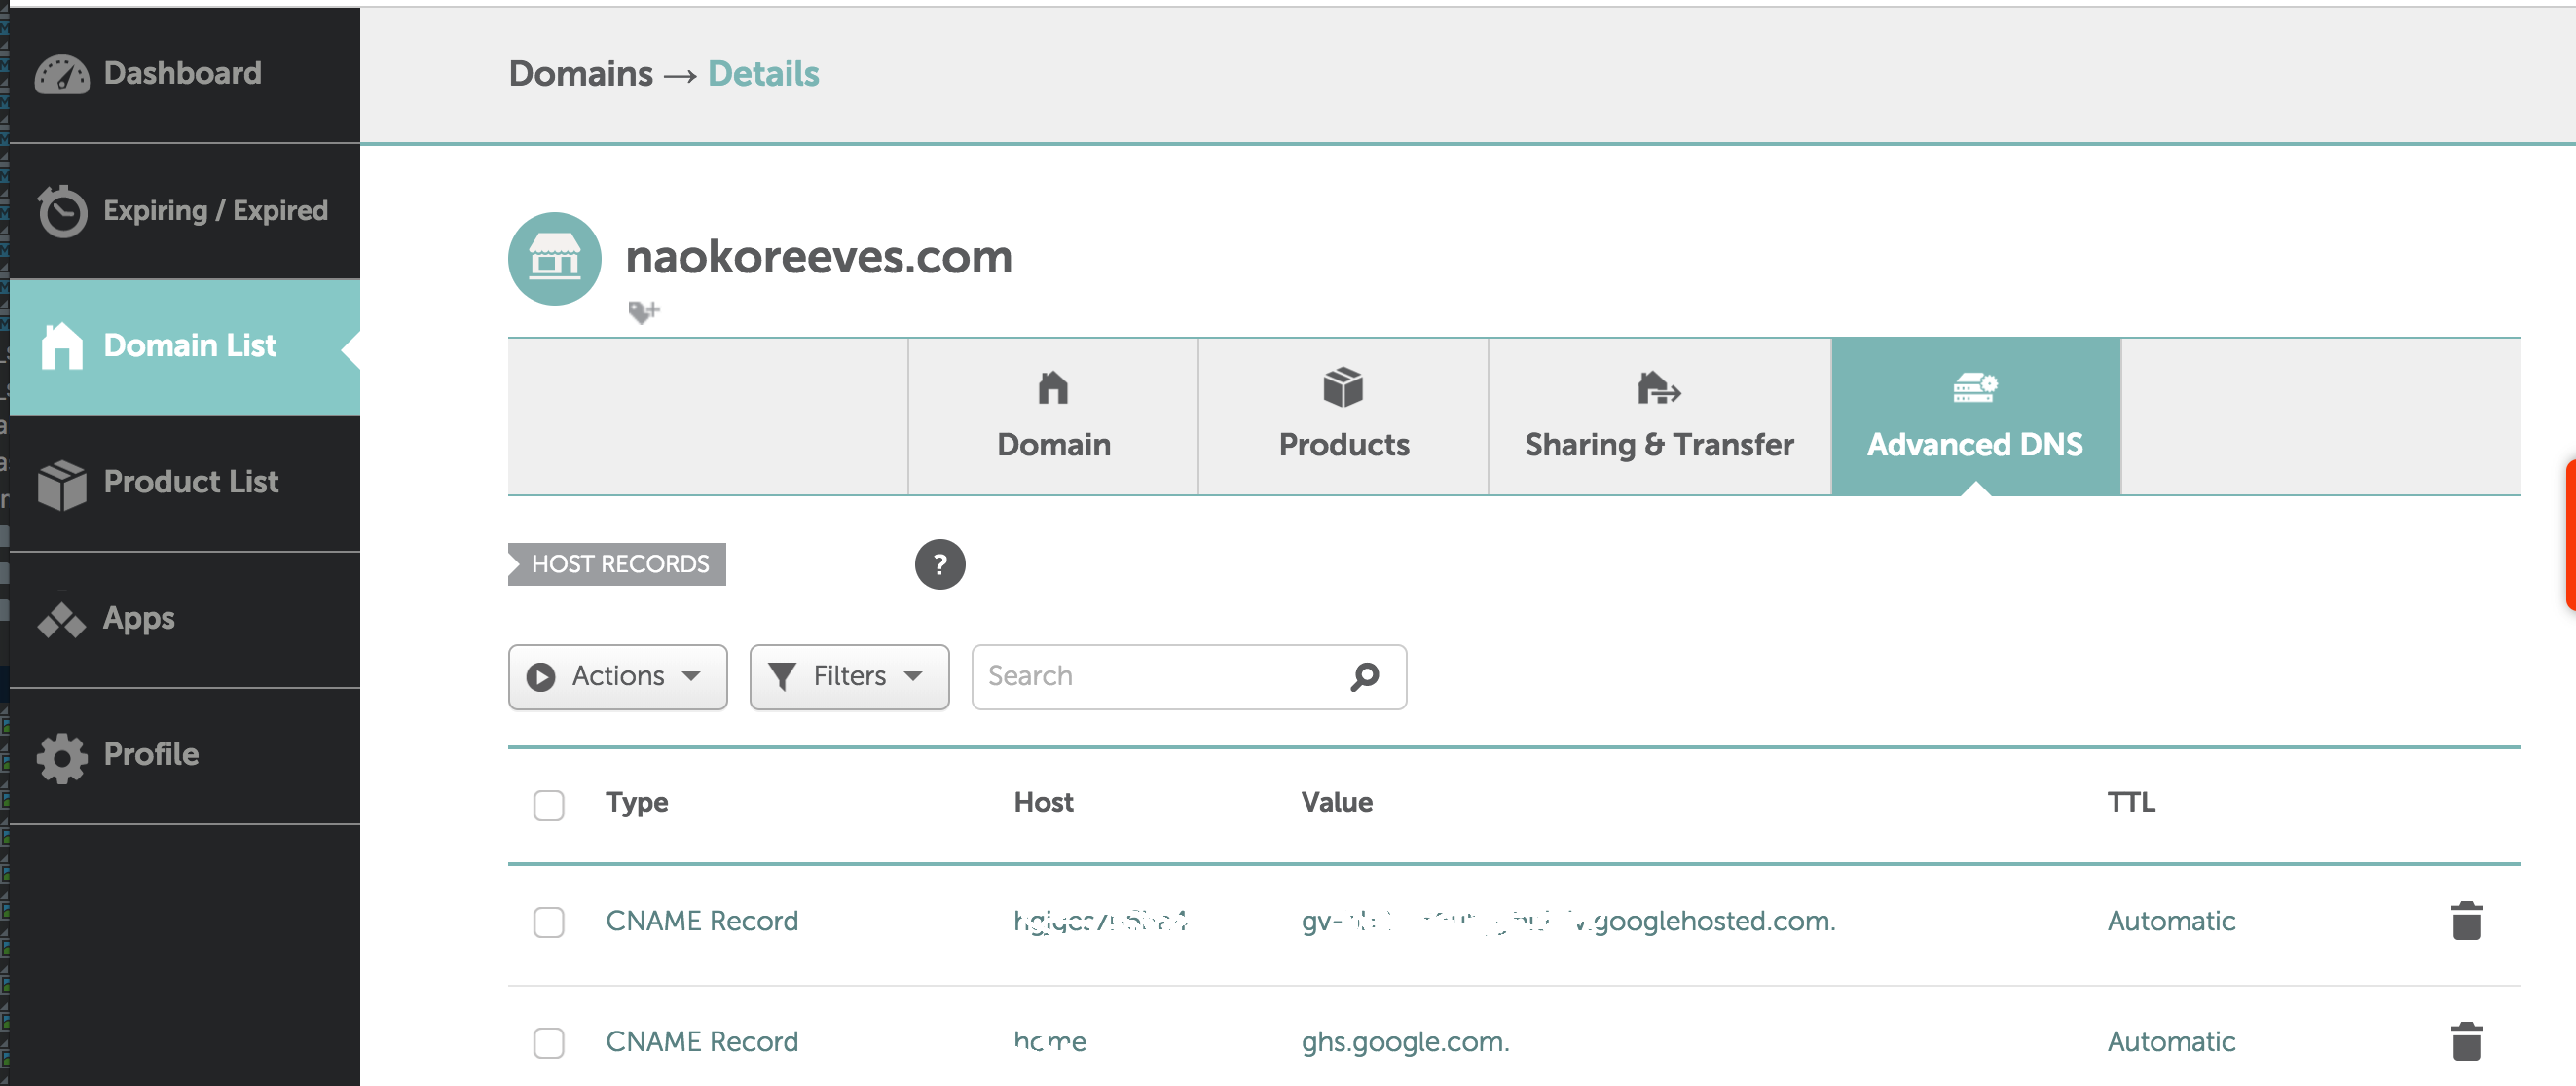
Now login to Cheapname and go to dashboard -> Domain List -> Advanced DNS
Click “Add New Record” link at the bottom and select “CNAME Record”
Enter value from “Name, Label or Host,” on Blogger as Host
Enter value from “Destination, Target or Points to,” on Blogger
which is “ghs.googlehosted.com” as value.
Repeat the same for 2nd row on Blogger
Wait for at least an hour for your DNS settings to activate.
Repeat steps 1 through 5. Once you click ‘save’ (step 5) You should not get an error this time.
Your blogspot.com address will redirect to your custom domain.
It may take to 24 hours.
You installed Elasticsearch on server. You can run
curl localhost:9200 and all looks good but the access is denied from outside
when curl <server-ip>:9200.
How to solve it
So first thing first. Elasticsearch do need to listen to ip you are accessing.
To make it listen to all, you can simply change / add
network.host: 0.0.0.0 to
/etc/elasticsearch/elasticsearch.yml
and restart elasticsearch server.
Try curl <server-ip>:9200 and works? That’s great. Your server is configured / ready for port 9200.
If your access is rejected then there are several things you can check:
Is server running?
Make sure to run systemctl status elasticsearch (assuming that you are managing the service via systemctl)
If it says active then you are good. If not, let’s start and test again.
● elasticsearch.service - Elasticsearch
   Loaded: loaded (/usr/lib/systemd/system/elasticsearch.service; disabled; vendor preset: enabled)
   Active: active (running) since Wed 2018-08-22 11:21:30 MST; 58min ago
Is port listening?
This is where I stuck. So you see 9200 is LISTEN only on tcp6 and not for ipv4.
I got stuck with this idea of ES is not bind to ipv4. Later I found this is good.
See here
for more details. but if you google “es not binding to ipv4” there are quite hit and
I was trying to apply the suggestion (e.g. set environment variable to force using
ipv4 etc export ES_JAVA_OPTS="-Djava.net.preferIPv4Stack=true -Djava.net.preferIPv4Addresses")
and had no luck of course because that wasn’t the problem as mentioned above.
Yes, this is first thing I did right? but I was running Ubuntu so used ufw (Ubuntu Firewall).
When I check the status, 9200 is is there to “ALLOW” as expected.
but I just could not access!
So just to be sure, from my host, I checked to see if 9200 is open on server
➜  ~ sudo nmap -p 9200 10.102.111.221
Password:

Starting Nmap 7.60 ( https://nmap.org ) at 2018-08-22 10:24 MST
Nmap scan report for es-01 (10.102.111.221)
Host is up (0.091s latency).

PORT     STATE    SERVICE
9200/tcp filtered wap-wsp
Then it shows “filtered”… wha~~~t???
Grrrr…
Okay, back to basic. Let’s check with iptable and see if all is good.
iptables -S
Note:
-S option (or --list-rules) [chain]: Print all rules in the selected chain.
If no chain is selected, all chains are printed like iptables-save.
Like every other iptables command, it applies to the specified table
(filter is the default).
Then I finally see the issue.
# iptables -S INPUT-P INPUT DROP
-A INPUT -p tcp -m tcp --dport 80 -j ACCEPT
...
-A INPUT -j REJECT --reject-with icmp-host-prohibited
...
-A ufw-user-input -p tcp -m tcp --dport 9200 -j ACCEPT
The iptables rules will be processed in line order of the file.
My newly added ufw-user-input (INPUT chain entered via ufw) was added at the very bottom.
Below REJECT which rejects the packet.
ufw do have insert <position-number> but still puts below the INPUT REJECT on iptables.
So what I end up doing is to insert at position 1 using iptables and finally worked… phew.
# insert a rule at line 1
iptables -I INPUT 1 -p tcp --dport 9200 -j ACCEPT
ufw is nice syntax but I guess in order to be able to use it, you want to have clean iptables
to starts with.
I need to ship specific log record and had formatter written in python.
It is pretty complex transformation.
I thought of using Logstash but I then need to either convert this python logic or write a plugin
to use already written python parser. Plus I need to install logstash…
I wanted a simpler solution
How to solve it
Use custom python logging Handler and Filter!
importloggingmessages=[]logger=logging.getLogger(__name__)logger.setLevel(logging.DEBUG)classListenFilter(logging.Filter):deffilter(self,record):"""Determine which log records to output.
Returns 0 for no, nonzero for yes.
"""ifrecord.getMessage().startswith('dont: '):returnFalsereturnTrueclassRequestsHandler(logging.Handler):defemit(self,record):"""Send the log records (created by loggers) to
the appropriate destination.
"""messages.append(record.getMessage())handler=RequestsHandler()logger.addHandler(handler)filter_=ListenFilter()logger.addFilter(filter_)# log I want
logger.info("logme: Howdy!")# log i want to skip
logger.info("dont: I'm doing great!")# prints ['logme: Howdy!']
print(messages)