Unused Docker image and container can quickly take up your disk spaces.
Let’s check disk usage
Summary of data used. You can add -v flag for detailed info.
$ docker system df
TYPE                TOTAL               ACTIVE              SIZE                RECLAIMABLE
Images              87                  1                   63.39GB             63.17GB (99%)
Containers          1                   0                   0B                  0B
Local Volumes       69                  1                   2.732GB             2.683GB (98%)
Build Cache         0                   0                   0B                  0B
Remove unused data
The following command will remove:
all stopped containers
all networks not used by at least one container
all dangling images (see below fo dangling images)
all build cache
By default, volumes are not removed to prevent important data from being deleted.
$ docker system prune
WARNING! This will remove:
  - all stopped containers
  - all networks not used by at least one container
  - all dangling images
  - all dangling build cache

Are you sure you want to continue? [y/N] y
Deleted Containers:
...
Total reclaimed space: 13.91GB
Options:
--all, -a: Remove all unsued images not just dnaling ones.
--volumes: prune volumes.
What’s dangling images?
Docker images consist of multiple layers. Dangling images, are layers that have no relationship to any tagged images.
They no longer serve a purpose and consume disk space.
tar czf new-tar-file-name.tar.gz file-or-folder-to-archive
c - create new archive
z - compress the archive using gzip
f - use archive file
Extract archives
tar -xzf tar-file-name.tar.gz
x - extract the archive.
z - uncompress the archive using gzip.
f - use archive file.
Let’s do it.
I only want to compress 3 files.
When I extract archive what I want to see is files in the directory.
$ tree file_dir/
file_dir/
├── file1.txt
├── file2.txt
└── file3.txt

$ cd file_dir
$ tar czf files.tar.gz .
tar: .: file changed as we read it

# moved files.tar.gz to different directory
$ tar -xzf files.tar.gz
$ ls
file1.txt  file2.txt  file3.txt  file_dir  files.tar.gz
GraalVM is a high-performance, embeddable, polyglot virtual machine for running
applications written in JavaScript, Python, Ruby, R,
JVM-based languages like Java, Scala, Kotlin, and LLVM-based languages such as C and C++.
Below is the way I installed GraalVM Community Edition on Ubuntu 18.04.
For other platform, the official doc installation
guide is here.
# update this number to latest version from here: https://github.com/oracle/graal/releasesversion=1.0.0-rc15
wget https://github.com/oracle/graal/releases/download/vm-${version}/graalvm-ce-${version}-linux-amd64.tar.gz
tar-xvzf graalvm-ce-${version}-linux-amd64.tar.gz
# clean uprm graalvm-ce-${version}-linux-amd64.tar.gz
# to wherever you want. mv graalvm-ce-1.0.0-rc15/ ~/bin/graalvm
# if you want to make it permanent, put this in your bashrc export PATH=$HOME/graalvm/bin:$PATH
Now that your graalvm/bin in your path, you’ll get the GraalVM versions of those runtimes.
before:
$ js --version
v8.10.0
now:
$ js --version
Graal JavaScript 1.0 (GraalVM CE Native 1.0.0-rc15)
Now let’s play with the Polyglot Shell
The Polyglot Shell is useful to quickly test interactive Graal languages. This is how you can start it:
$ polyglot --jvm --shell
GraalVM MultiLanguage Shell 1.0.0-rc15
Copyright (c) 2013-2019, Oracle and/or its affiliates
  JavaScript version 1.0
Usage:
  Use Ctrl+L to switch language and Ctrl+D to exit.
  Enter -usage to get a list of available commands.
js>
Ah, it is listing only JavaScript. Got to install “python component” to run Python
gu install python
Now invoke it again
$ polyglot --jvm --shell
GraalVM MultiLanguage Shell 1.0.0-rc15
Copyright (c) 2013-2019, Oracle and/or its affiliates
  JavaScript version 1.0
  Python version 3.7.0
Usage:
  Use Ctrl+L to switch language and Ctrl+D to exit.
  Enter -usage to get a list of available commands.
js> console.log('hello')
hello
python> print('hello')
hello
python>
Oh yay!
For just python interactive shell
$ graalpython
Python 3.7.0 (Thu Apr 04 19:04:32 UTC 2019)
[GraalVM CE, Java 1.8.0_202] on linux
Type "help", "copyright", "credits" or "license" for more information.
Please note: This Python implementation is in the very early stages, and can run little more than basic benchmarks at this point.
>>> print('hello')
hello
>>>
Debugger?
Debugger is available to all the GraalVM languages.
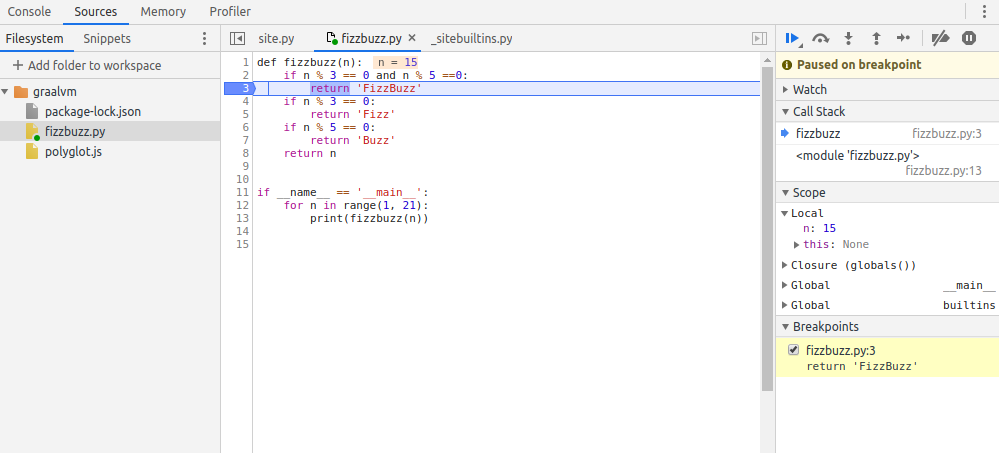
Let’s play with it. Prep the FizzBuzz program in python fizzbuzz.py
$ graalpython --jvm--inspect fizzbuzz.py
Debugger listening on port 9229.
To start debugging, open the following URL in Chrome:
chrome-devtools://devtools/bundled/js_app.html?ws=127.0.0.1:9229/2c9f9fb0-8067ef52f64c8
Open the URL in Chrome
Click “Add folder to workspace” on the left to navigate the folder your fizzbuzz.py is located
Open fizzbuzz.py from Workspace and place breakpoint then resume script execution
python tracing in chrome deubber
Wow, that’s kind of impressive!
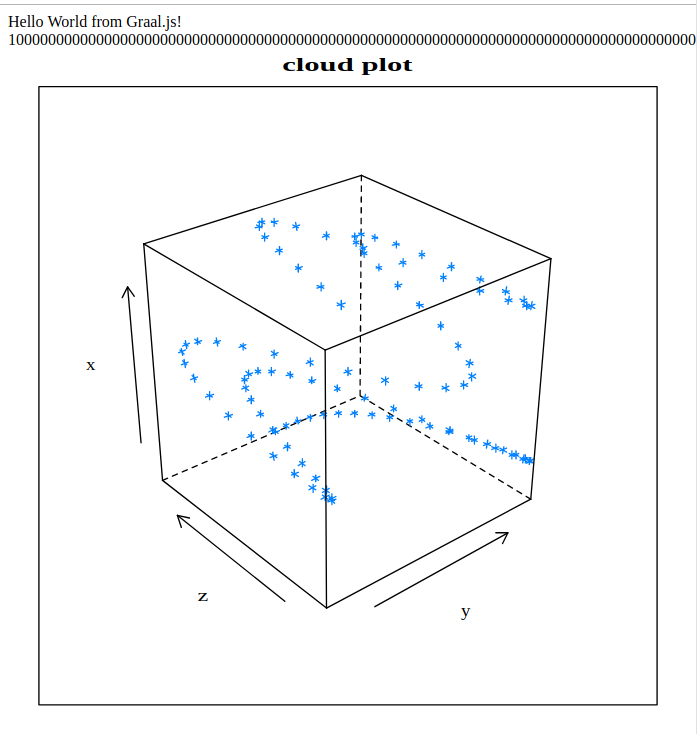
Web app in multiple languages
So this example is from this article
Let’s create polyglot.js
constexpress=require('express')constapp=express()constBigInteger=Java.type('java.math.BigInteger')app.get('/',function(req,res){vartext='Hello World from Graal.js!<br> '// Using Java standard library classestext+=BigInteger.valueOf(10).pow(100).add(BigInteger.valueOf(43)).toString()+'<br>'// Using R interoperability to create graphstext+=Polyglot.eval('R',`svg();
require(lattice);
x <- 1:100
y <- sin(x/10)
z <- cos(x^1.3/(runif(1)*5+10))
print(cloud(x~y*z, main="cloud plot"))
grDevices:::svg.off()
`);res.send(text)})app.listen(3000,function(){console.log('Example app listening on port 3000!')})
I was on AWS and needed to select SSH Key pair.
It has been a while that I needed to create one that might require SSH Key pair.
So to be sure I got the correct key, I needed to compare fingerprint listed on Key Pair list.
I do have pem key with name contain aws so I want to generate finger print for that key.
How to solve it
openssl pkcs8 -in path/to/private_key_file -nocrypt-topk8-outform DER | openssl sha1 -c